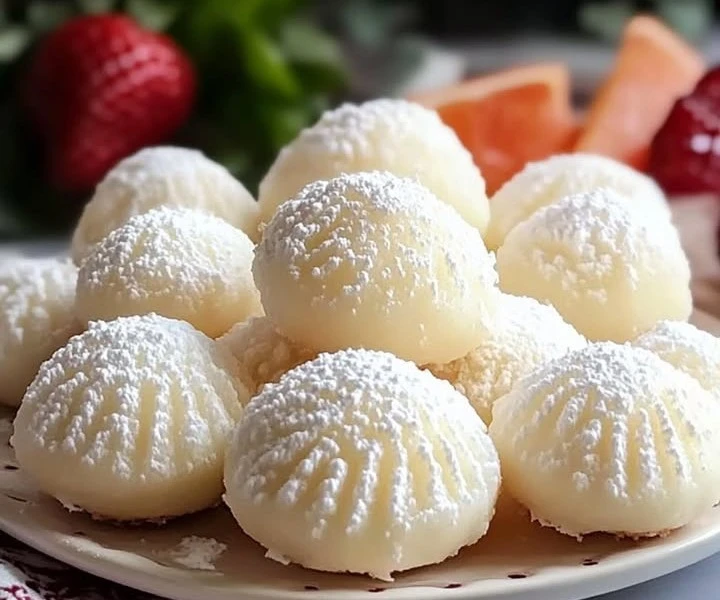
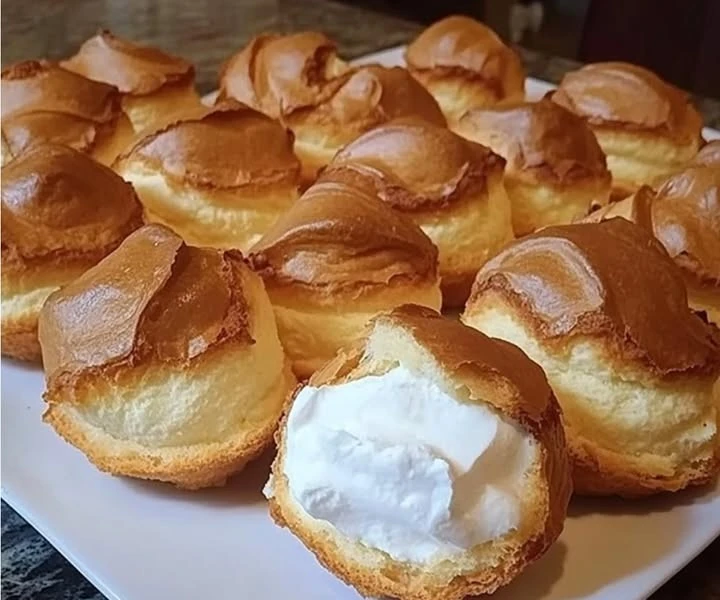
Mom’s Famous Cream Puffs
Mom’s Famous Cream Puffs : welcome to the delightful world of homemade desserts! Today, we will dive into a special recipe that has been a family favorite for years: Mom’s Famous Cream Puffs. These light, airy pastries are filled with creamy goodness that brings smiles all around. They’re perfect for any occasion, whether it’s a birthday, holiday, or just a regular day when you want to treat yourself and your loved ones.
Cream puffs are not just tasty; they also have a unique way of bringing friends and family together. Imagine a table full of warm, freshly made cream puffs, everyone reaching out to grab one, and laughter filling the air. That’s the kind of joy that comes with making and sharing Mom’s famous cream puffs. So, let’s get started on making this delightful treat!
Why You Will Love This Recipe
You will love this recipe for many reasons. First, cream puffs are fun to make! The dough is simple, and watching them puff up in the oven is exciting. Second, the filling can be customized to your liking. Maybe you prefer vanilla, chocolate, or even a fruity flavor—whatever you choose, it’s sure to be delicious.
Another reason to love this recipe is that it’s versatile. You can serve cream puffs at a fancy gathering or enjoy them at home with family while watching a movie. They also make wonderful gifts. Just imagine giving a box of cream puffs to a friend or loved one.
Finally, making cream puffs is a great way to bond with family or friends. You can all get together in the kitchen, share stories, and create something wonderful. So, grab your apron, and let’s whip up a batch of Mom’s Famous Cream Puffs!
How to Prepare Mom’s Famous Cream Puffs
Preparing Mom’s Famous Cream Puffs is straightforward, and you will need a few ingredients and some time. Let’s go through the list of ingredients and the steps to make this delicious dessert.
Ingredients:
- For the Pâte à Choux (Pastry Dough):
- 1 cup water
- 1/2 cup unsalted butter
- 1 cup all-purpose flour
- 1/4 teaspoon salt
- 4 large eggs
- For the Filling:
- 2 cups heavy cream
- 1/4 cup powdered sugar
- 1 teaspoon vanilla extract (or flavor of your choice)
- For the Glaze (optional):
- 1/2 cup chocolate chips (or melted chocolate of your choice)
Instructions:
- Make the Pâte à Choux:
- In a medium saucepan, bring the water and butter to a boil over medium heat. Stir occasionally until the butter melts completely.
- Once the mixture is boiling, remove it from the heat and add the flour and salt all at once. Stir quickly with a wooden spoon until the mixture forms a ball and pulls away from the sides of the pan. This should take about 1-2 minutes.
- Allow the dough to cool for about 5 minutes.
- Add the eggs one at a time, mixing well after each addition. The dough should be smooth and glossy.
- Bake the Pastry:
- Preheat your oven to 400°F (200°C).
- Line a baking sheet with parchment paper.
- Using a piping bag or spoon, drop small balls of dough (about 1-2 inches wide) onto the prepared baking sheet, making sure to leave space between them.
- Bake in the preheated oven for 20-25 minutes, or until they are golden brown and puffed up. Do not open the oven door during baking, as this can cause them to deflate.
- Once done, turn off the oven and leave the cream puffs inside for an additional 5-10 minutes to dry out a little.
- Prepare the Filling:
- While the cream puffs are cooling, whip the heavy cream in a mixing bowl until it starts to thicken.
- Add the powdered sugar and vanilla extract, and continue whipping until stiff peaks form.
- Fill the Cream Puffs:
- Once the cream puffs are completely cool, use a sharp knife to slice a small opening in the side of each puff.
- Use a piping bag or a spoon to fill each cream puff with the whipped cream mixture.
- Add the Glaze (optional):
- If using chocolate, melt the chocolate chips in the microwave or over a double boiler. Drizzle the melted chocolate over the filled cream puffs for an extra special touch.
How to Serve Mom’s Famous Cream Puffs
Serving Mom’s Famous Cream Puffs is as easy as enjoying them fresh from the oven. You can display them on a beautiful plate, drizzle with chocolate, or dust with powdered sugar for a fancy touch.
Cream puffs can be served as individual desserts or stacked on a tiered cake stand for a stunning presentation. They pair wonderfully with coffee, tea, or any dessert wine.
If you are hosting a party or gathering, consider serving them with a selection of other desserts. This way, guests can enjoy choosing their favorites while the cream puffs stand out as the star of the show.
How to Store Mom’s Famous Cream Puffs
If you happen to have some cream puffs left over (which is rare because they’re so delicious!), it is important to store them properly.
To store cream puffs, place them in an airtight container in the fridge. They are best eaten within 1-2 days but can last up to 3 days. However, the longer they sit, the less crispy they become.
If you want to prepare them in advance, you can make the pastry dough and bake the puffs without filling them. Store the cooled, unfilled shells in an airtight container at room temperature for up to 2 days. Fill them just before serving for the best texture.
Tips for Preparing Mom’s Famous Cream Puffs
- Do Not Rush the Dough: Making the pâte à choux takes a bit of time and patience. Ensure the water and butter are boiling before adding the flour for the best results.
- Use Room Temperature Eggs: Room temperature eggs integrate better with the dough, giving you a smoother texture.
- Keep the Oven Door Closed: It’s essential to keep the oven door closed while the puffs are baking. Opening it can cause the puffs to collapse.
- Experiment with Fillings: While the whipped cream filling is classic, don’t hesitate to try custards, fruit, or other flavors. You can even mix different fillings for a fun surprise!
- Practice Piping: If you’re using a piping bag, practice a bit on parchment paper to get comfortable with the technique.
Variation
Cream puffs are incredibly versatile, and you can create many variations. Here are a few ideas:
- Chocolate Cream Puffs: Use chocolate ganache for the filling instead of whipped cream for a chocolate lover’s dream.
- Fruit Cream Puffs: Add fresh fruit, such as strawberries or raspberries, to the whipped cream filling for a fruity twist.
- Savory Puffs: Replace the sweet filling with a savory mixture such as cheese, herbs, or seasoned meats for a delightful appetizer.
Frequently Asked Questions
- Can I freeze cream puffs?
- Yes, you can freeze unfilled cream puffs. Place them in a freezer-safe container and store them for up to a month. When ready to serve, let them thaw, and then fill them with the cream.
- Why did my cream puffs not rise properly?
- There could be several reasons for this. The oven may have been opened too soon, or the dough might not have been cooked enough before baking. Make sure to follow the recipe closely for the best results.
- Can I make the filling ahead of time?
- Yes, you can prepare the filling a few hours ahead. However, it is best to fill the cream puffs right before serving to keep them crisp.
Making Mom’s Famous Cream Puffs is a wonderful way to create delicious memories in the kitchen. With a little time and creativity, you can enjoy these delightful treats with family and friends. Happy baking!